Hotmail is one of the most popular email services out there. Millions of people use it (including me) and its great. But that said I do have one big problem with it...
Hotmail doesn't work with any mail client unless you buy a premium membership!
This means it doesn't work with Mac Mail or any other email applications for mac. But, luckily there's ways to work around this. If you've ever wanted to use your Hotmail, Windows Live or MSN email with Mac Mail this is how to do it.
Solution #1 - Switch Your Email
The best solution is to switch to a service that does work with Mac Mail (I'd suggest Gmail).
You may not want to do this but it's the best in the long run. I'm sure many people won't want to do this if everyone they know sends them info through their Hotmail address. I too didn't feel like telling everyone to switch.
So if that's the case then here it is.
Solution #2 - Download "MacFreePops"
This is best way I know for getting your mail out of hotmail. You may have heard of "httpmail". I've tried it and it failed, so I'll show you how I got it to work with MacFreePops.
- Download and Install MacFreePops
Click here to get MacFreePops. Once it's downloaded move it to your application folder.
- Open Mac Free Pops
When you first open it up the window will look something like this.
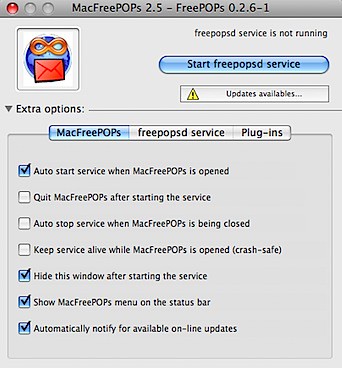
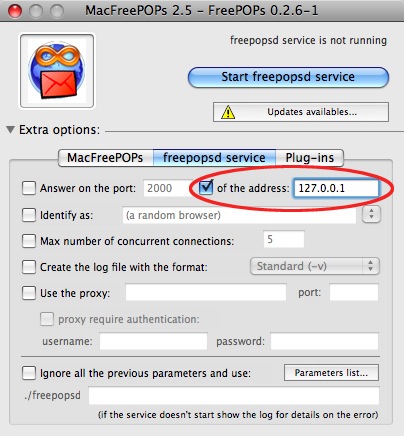
Before you start, make sure Mac Free Pops is updated. Click where it says "Updates Available" to download all the updates. Do this twice to get everything, after the second time don't worry if it says there are updates.
Next check all the options you want. I've circled all the ones I have but you can do whatever you like.
- Check You Have The Right Settings and Start MacFreePops
Click "freepopsd service". Make sure that window looks like this. Check that the circled things are set right too. When your all done click "Start freepopsd service".
- Make a New Mail Account
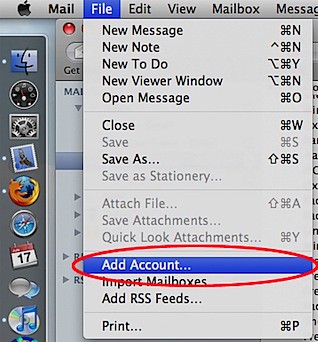
Open up Mail. Click "File > Add Account...".
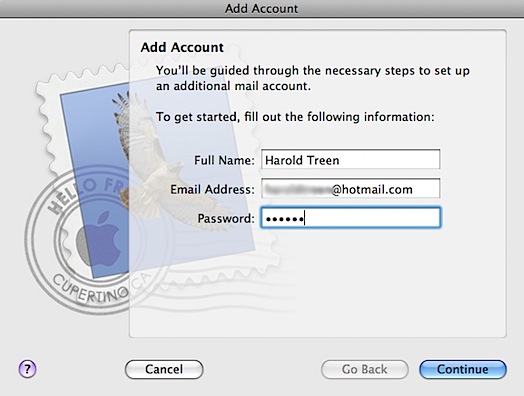
Start setting up your new account by entering your Name, Complete email and Email password. Click "Continue" when your done.
Next you're asked to setup your Incoming Mail Server. To do this:
- Set the account type to POP.
- Enter any description you like.
- Set "127.0.0.1" as your Incoming Mail Server.
- Make sure the user name is your FULL email (includes the @hotmail.com, @live.com, @msn.com, etc.).
- Click Continue.
If you get an error message ignore it and keep going.

Ignore "Incoming Mail Security" and keep going to "Outgoing Mail Server". For this:
- Put in any description you like.
- For my outgoing mail server I use "smtp.gmail.com".
I believe it works without authentication. If not you can set up a gmail account for free and use put in your user name and password for authentication. Try without authentication first and see how it goes. You can keep "Use only this server" checked.
- Click Continue.

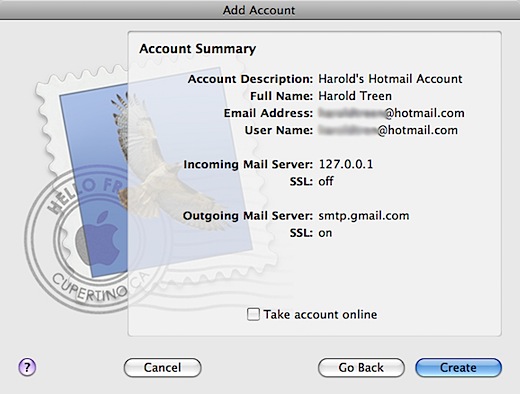
Mail will then take you to a summary of all your settings. Make sure everything looks right and click "Create".
- Modify Your New Account's Settings
The last thing you need to do is change a few account settings. Open Mail again and click "Mail > Preferences".
To finish setting up your account:
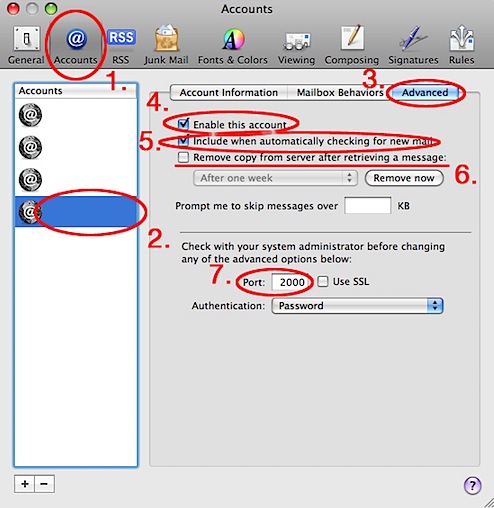
- Go to the "Accounts" section.
- Choose the account you just created from the left-hand menu.
- Go to the "Advanced" section.
- Make sure "Enable this account" is checked.
- Make sure "Include when automatically checking for new mail" is checked.
- I would suggest unchecking "Remove copy from server after retrieving a message:". If you ever need to switch back to using Hotmail the old way, all your e-mails will be gone. Better to just leave them.
- Change the port to "2000".
Congratulations, your done!
Now whenever you click "Get Mail", Mac Mail will check your hotmail account for e-mails.
If it doesn't work, you probably have quit MacFreePops. Make sure it is open and that the service is running.
Now checking your email can be a lot quicker. Good Luck!